Harden windows servers
Windows Server has new security features, best practice wizards, and sleeker interfaces to enhance the security posture of the operating system installation. Windows Server has a major install base and is relevant to cover for server hardening. Most settings are similar and familiar between the different Windows desktop and server versions.
It should be noted that many of the advanced network management and security features require an Active Directory implementation to fully leverage. As with any corporate network the security is the sum of its parts and we focus here on ensuring that Windows Server systems are properly installed and configured.
Microsoft Server uses Server Manager roles and features to configure and install server components. To open the server manager goto ->Administrative Tools->Server Manager.
Figure 1: Computer Management Interface, all Windows
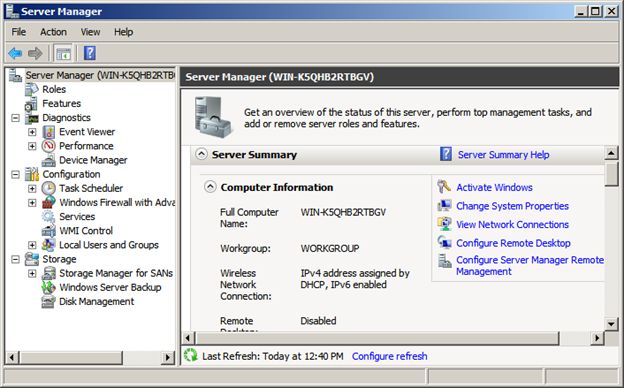
Figure 2: Server Manager for Microsoft Windows Servers

Microsoft Server Manager gives you a good snapshot of the configured features of your server. You can see firewall settings, registration information, roles installed, and Windows Server features that are installed and enabled. By default a Windows server installation leaves much of this configuration for post-installation tasks.
You can also use the Programs and Features control panel applet to list installed applications. In Windows you can use the Task Manager to view running processes, their paths, and system utilization.
Process explorer is a Sysinternal tool now owned and supported by Microsoft. Process Explorer allows you to see processes and their perspective process trees and dependencies.
Figure 3: Sysinternal Process Explorer showing running processes.

To show disk space and utilization and to manage any disk volumes use the Disk Management feature in the Server Manager.
Figure 4: Windows Server Disk Management view in Computer Management application.

To see startup processes there are several places to check. The msconfig utility is a good place to start. This application gives you the running and startup services all in one convenient place.
Figure 5: Msconfig application showing services and status.

The windows registry contains many settings and startup options as well. Using the regedit application you can check the following registry key for tasks that are set to run when windows starts.
HKEY_LOCAL_MACHINE\SOFTWARE\Microsoft\Windows\CurrentVersion\Run
Also, the startup program menu is a good place to look for tasks that may run once a user is logged into the system. Often times malware is started via this startup option out of a users profile directory. Be sure to check both the All Users startup folder and the startup folder in each user profile directory.
Utilize the Windows update application to configure system updates if you do not have an enterprise patch management system. From within the Windows Update applet you can set when your system runs updates and reboot behavior. Many server systems should be manually updated, tested, and restarted during maintenance windows.
Figure 6: Un-configured Windows updates interface for Legacy Windows Operating Systems

Figure 7: Use gpedit to override Windows 10 and Server settings by Microsoft.

Ensure that system time is correct and synchronized to a reliable time source
To setup time synchronization use the system clock or the control panel applet for Date and Time. The Internet Time tab allows you to configure a time source.
Figure 8: Windows interface for setting time server source

You can also utilize the w32tm command line options to configure the Windows Time Service. If your system is on a Windows Domain, time synchronization is important for local maintenance and system tasks. Domain computers will sync to your designated domain controllers which should be synchronized to a reliable external time source. All computer clocks vary slightly and you may notice time drift more on older systems due to low CMOS battery voltage.
To fine tune time synchronization and server settings look at the registry keys under:
HKEY_LOCAL_MACHINE\SYSTEM\CurrentControlSet\services\W32Time
From within these registry settings you can edit polling intervals, time sources, and fine tune your time variance and correction behaviors.
Log file maintenance and configuration
Windows log files should be configured properly. Log files are the first place to look when you suspect odd system behavior. Properly configured log files should be setup so that they do not overwrite themselves as this is one method that an attacker might cover their tracks. If possible archive log files and copy them off to another location to prevent log file tampering.
Various third party log management tools are available, but the build in Windows interface allows easy filtering and management of basic log file tasks. You can also use the built in subscription and log file collection services to centralize and copy off log files.
Figure 9: Configuration dialog to change the log file path, size, and overwrite settings. Note: Archive the log file as a minimum.

Lock down file system security, permissions, and Group Policies
Windows utilizes the NTFS file system which allows for granular file permissions based on access control lists. Server 2012 now includes another layer of access control via Dynamic Access Control technology. To edit the NTFS permissions and audit settings for files and directories right click the file or directory and goto Properties. Then under the security tab you can open Advanced Settings to see the following applet.
Figure 10: NTFS Access Control List for wwwroot directory

Note that in order for file auditing to be enabled and active you have to enable object access success and/or failure in the applicable group policy or local security policy and then enable auditing for the files you want to audit access to through these advanced security settings.
Utilize the Local Security Policy management console or edit the effective domain policy to meet your organizations requirements. There are many settings within the Local Security Policy and we touch on a couple important ones here. It is a good idea to look through these settings in detail as you can modify the security behavior in a very granular way depending on your needs.
Password policies should be updated to meet your needs. Password age of 90 days or less is recommended. It is also recommended for the system to remember passwords so that users cannot recycle old passwords. Password length should be over 10 characters and complexity requirements are enabled by default.
Figure 11: Local Security Policy MMC for password policy settings.

Auditing should also be enabled for success and failure. There are several things which you can enable auditing for. At the very least you should enable Success and Failure Auditing for logon events and privileged use. Events that correspond to these settings are logged in the Windows Security event log.
Figure 12: Configure Auditing for Success and Failure of various events.

Under the User Rights Assignment policy you find several settings that are worth checking. You can specify which users have the logon locally rights and can deny or allow granularly based on your needs.
Figure 13: Various user rights assignments on the local policy.

There are various command line tools for applying and testing group policy settings.
The most effective command line tool for seeing the effective audit policy is auditpol.exe.
auditpol.exe /get /category:*
To reapply effective policies to a computer you can wait about 15 minutes, restart the machine, or run gpupdate.exe from the command prompt.
Audited objects and events are logged in the system security event logs.
Figure 14: Security Event log showing Audited events.

Follow best practices for securing any SQL data and log files. SQL BINN and DATA file directories should only allow those users access that need it. You can also utilize the Best Practice Analyzer to verify your installation and security configuration.
Database security has its own chapter however these things are worth considering. When protecting a database is that data is often times the fields are clear text unencrypted. In the least protected information that you are storing needs to be encyped data fields. Password and sensitive data such as credit card numbers should be hashed and the hashed data value should reside in the database. Encryption of the underlying file system and any database backups is recommended.
User access to database applications should be over SSL connections and clear text authentication should be disabled. SSL certificate installation and safeguarding helps to prevent man-in-the-middle compromises. Backups and file systems should be physically safeguarded to prevent attackers from having a crack at the database. Remember once an attacker has the data or access to the server console your system is as good as hacked with most measures such as encryption and hashing only delaying the disclosure of data.
Web applications should be protected against SQL injection attack methods and all input fields should be filtered and defined.
Configure IIS and verify permissions on website file folders. When you install and configure IIS, only install the features that you need. If you are using third party engines like PHP or Wordpress be sure to keep these packages up to date with the latest stable release. Known vulnerabilities in third party apps are often the attack vector used to compromise a system.
IIS includes built in security features that should be enabled and configured such as URL Authorization, Request Filtering, and IP address restrictions. Request filtering passes all incoming requests through a set of rules that helps to ensure only valid requests are allowed.
The IIS management console allows you to configure these settings and adjust them to meet your needs.
Configuration should take into account your network segmentation and server placement. Windows Firewall is a robust host based firewall which allows for granular port, protocol, and application configuration. Only those services that need to be opened should be opened.
Windows firewall comes pre-loaded with inbound and outbound rules for most services. You can enable and disable these as a starting point.
Figure 15: Windows Firewall and Advanced security interface.

Please see section on security through obscurity for more settings.
Even though Symantec recently reported that Anti-virus is useless, it is recommended to run anti-virus or anti-malware software on your system. These applications or only as good as their configuration and current definition versions but can allow you to be protected against known wild variants of bad software.
System files should be checked for integrity and compared regularly to known good source. You can easily find and compare checksums of system files and backup files. If configuration files have changed it should raise a red flag.
Commercial anti-virus software is available for Windows systems and is recommended to have this installed and properly configured. Some anti-virus software has problems with large database files so you will want to exclude them from scanning if your disk and CPU utilization is a problem. Automatic updates or at least regular manual updates should be configured for your anti-virus solution.
Windows server makes use of the Security Configuration Wizard (SCW) to help configure your system. The security configuration wizard can be launched from within the Administrative tools or the server manager tools.
Figure 16: Windows Security Configuration Welcome screen

This built in Microsoft wizard allows you to create, edit, apply existing or roll back configuration settings. The wizard asks you questions about your desired configuration and then attempts to make the Security Policy changes and Firewall changes for you based on your needs.
Figure 17: Security Configuration Wizard - create, edit, apply existing, and rollback options

Figure 18: The SCW Viewer allows you to see at a glance what your settings are

Utilizing the SCW Viewer you can look at your configuration database and the settings which the wizard can control. Once you find the configuration that is proper for your application you can save these and apply them to other servers in your environment.
Before applying SCW settings you can see the before and after settings on various services and features.
Figure 19: Print spool service before configuration changes and after

It is important to note that you should understand what the underlying consequences are for changing the settings through this wizard. A production server should be tested before applying new policies and you should make sure that you get a backup of your settings before you proceed if your system is already in production.
#WannaCry SMB Stack Hardening - Example of hardening to mitigate a security threat on your network.
During the week of Monday May 8th, 2017 a fast spreading malware referred to as WannaCry began to spread around the globe affecting many networks with a ransomeware. Ransomeware is when a targetted computer is taken over by a program where the data or system is held hostage or in the case of the WannaCry attack is encrypted with a message to pay a ransome in order to restore usability.
The WannaCry malware attacks primarily used a known vulnerability in the Microsoft core Server Mesage Block protocol, or SMBv1. Microsoft released patches for this particular vulnerability however one way to mitigate this problem and future problems with SMBv1 is to disable this protocol and enable or force SMBv2 and SMBv3.
Using either the registry or the windows power shell you can force your servers to implement this configuration. The official Microsoft Support site has details on how to perform this for your operating system. This support site can be found at "https://support.microsoft.com/en-us/help/2696547/how-to-enable-and-disab..."
On Windows 10 or Server 2012 and newer use the following command in powershell to disable SMBv1.
"Set-SmbServerConfiguration -EnableSMB1Protocol $false"
To check which versions of the SMB protocol your system is running, on a Windows 10 desktop or Server 2012 or newer system, you can use powershell command:
"Get-SmbServerConfiguration | Select EnableSMB1Protocol, EnableSMB2ProtocolGet-SmbServerConfiguration"
A screen shot of output below shows that the SMBv1 protocol is disabled.

In order to enable the SMBv2 and SMBv3 protocols for a Windows 10 desktop or Server 2012 or newer system, you can use powershell command:
"Set-SmbServerConfiguration -EnableSMB2Protocol $true"
After disabling SMBv1 and Enabling SMBv2 you can then re-run the "Get-SmbServerConfiguration | Select EnableSMB1Protocol, EnableSMB2ProtocolGet-SmbServerConfiguration" command and see similar output to the following screen shot.

Microsoft Security References:
http://support.microsoft.com/kb/2029023